Monday June 27, 2016 at 2:11pm
How to model the UEFA Euro 2016 Football in SOLIDWORKS using tools such as split lines, surfaces and patterns!
The Beautiful Game Ball. At least the translation of Beau Jeu. So how can we model this up in SOLIDWORKS?
Will we need complex surface tools? Weird lofts? No! We use a split line or two, copy a couple of surfaces and pattern, pattern, pattern.
So let’s get started!
Step 1: Draw a sphere 220mm diameter
This is the standard size of the competition ball, at least as far as google would tell me. I shelled the ball to be just 3mm in thickness. I could calculate the exact thickness to get the correct weight, but 3mm will do for now. Either use a thin feature or a solid and the shell command. I’ll leave you to do this under your own steam.
Step 2: Create a ‘square’ face
If you examine pictures of the ball you will see that it is made of just 6 pieces. So we will start with two simple cuts. Here we are creating a version with 6 identical ‘square faces.
The lines are equal in length and perpendicular to each other. The tips are horizontal too. I tried to use as little sketch geometry as possible.

Step 3: The Split
Now comes the ‘fun’ bit. We need to create the shape for the actual face. We only have to do a small section, but we will make sure it matches up as nicely as we can.

We want a 3D sketch. It is easier if we draw the constriction lines first. We then use the spline on Surface to create a three point spline. Start at the corner and click near the middle of the face and then we want to pick up the end of the construction line. Don’t worry too much about the middle point we can always do back and drag it to a better position. Ensure that the spline is tangent to our construction line. Next for the Split Line command. It is under the Curves button on the Features Tab.

If all has gone well then the model should look like this:

Step 4: Copy and Thicken
We want to use the offset surface tool here. It is on the Surfaces tab of the command manager. If we set the offset to 0mm, we will create a copy of the two top faces. Once this is done we delete the original body. Its work is done here. We can then Thicken (Surfaces Tab) the faces. Do not use Merge Result!
We will then have two bodies in our part (shown in different colours for clarity):

Step 5: Pattern the Cuts
We need an axis that passes through the Front and Right planes. Then we use a circular pattern to add three additional copies of the ‘cut’ body.

Then we will use the Combine command to Subtract the patterned bodies from the large piece.

Do not delete the RED part. We still need that! Also you may want to go back and tweak your spline to ensure a nicer central cross.
Step 6: Finish the section
Now we need to finish our section, so to start we will use Move/Copy Bodies to rotate the RED part 180 degrees. Use the edge at the corner as a reference.

Then we use another circular pattern to add the remaining parts:

And Combine and add a fillet to finish the section:

Step 7: The final patterns
Now we just need to pattern the sections to create a solid ball. Here we create an axis from the origin to a sharp corner of our part and use that for a circular pattern of the body.

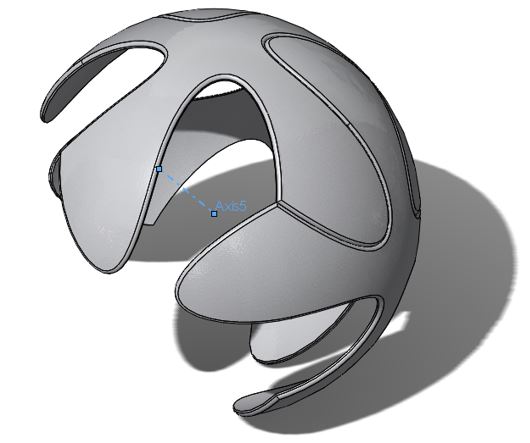
We now have half of the ball. You could repeat the last step to try to add the remaining faces, but we can do it with just one more circular pattern. First create the Axis:
 T
T
This goes from the origin to the Vertex that is half way down the ‘tongue’. We can then use a circular pattern to finish our ball:

Conclusion/Penalty Shoot out
So there we have it the Beautiful Game Ball. If we tweak the shell thickness we could get an accurate weight for the ball as well, or perhaps we could use Flatten surface to find the cut shape required for the flat leather sheet.
With that done I think I can go and watch some football!

Get a SOLIDWORKS quote today to take advantage of our special offers ending 30th June.