











Best Practices for Storing SOLIDWORKS Simulation Results
Written by: Oliver Martin
Published: May 28, 2026
| View All Blogs
When working with SOLIDWORKS Simulation, effective file management is essential. If simulation results are stored incorrectly, users can encounter a wide range of issues, from studies taking far longer than expected to complete to simulations suddenly crashing or failing to start altogether.
SOLIDWORKS users can control where simulation results data is saved, and it is important that best practices are used to ensure simulations run efficiently and error-free. This guide explains how to correctly manage SOLIDWORKS Simulation results files to ensure your studies run as efficiently and reliably as possible, while keeping your data safe and organised.
Reading SOLIDWORKS Simulation Results
Once the solver has finished running a simulation, you can begin reviewing the results. By default, SOLIDWORKS generates a number of standard plots, but users can define more specialised result plots to assess whether the objectives of the study have been met.
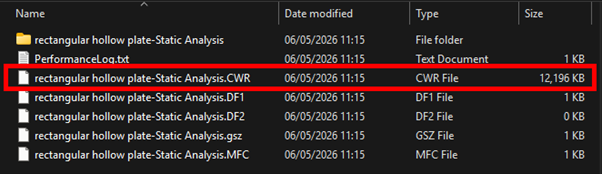
An example SOLIDWORKS Simulation results file
SOLIDWORKS Simulation writes its calculated results to a CWR file. While the simulation setup (fixtures, loads, connections, and mesh controls) is stored in the CAD file, all solver calculations and result data are written to the results file.
How Do SOLIDWORKS Simulation CWR Files Work?
The CWR file generated by a simulation study contains a collection of temporary files that SOLIDWORKS actively reads from and writes to during the solve process. While the model remains open, these temporary files are visible in Windows File Explorer within the results directory and are essential for both solving and displaying results.
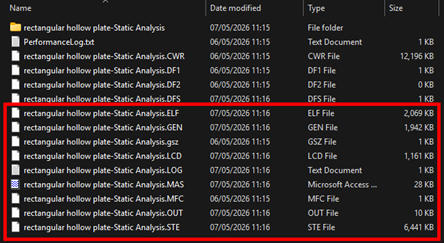
Simulation results with temporary files visible
Once the model is saved and closed, SOLIDWORKS packages these temporary files into a single results file. If the model is reopened, the temporary files are re-extracted from the CWR, and SOLIDWORKS reads from them again to display your results.
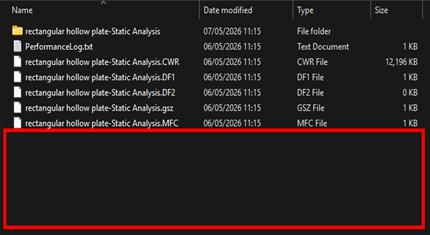
Temporary simulation files hidden after closing SOLIDWORKS
Once the CAD file is closed and the results data is no longer required, all temporary files are packaged back into the CWR file.
Where Are Results Files Saved?
By default, SOLIDWORKS saves simulation result files in the same location as the CAD model. You will find the file saved using a $FileName – $StudyName.CWR format.
Additional results-related files with GSZ and MFC extensions are also created, but are non-essential. As you can imagine, this can quickly clutter your file explorer and make file management more difficult.
To avoid this, SOLIDWORKS allows you to define a specific location for storing simulation results, keeping CAD files and results separated.
Where Should You Store Simulation Results?
Being able to change the default directory for SOLIDWORKS Simulation results means that you can tailor your system to your organisation’s requirements. While many teams think that putting it with the rest of their data is best, it is important to consider the performance implications of common methods.
Network Drives
Storing simulation results on a network drive can introduce performance and reliability issues. During the solve process, SOLIDWORKS continuously writes data to the results files and then reads from them to display your plots.
No matter how fast you think your network connection speed is, storing these files on a network drive will always result in slower read and write speeds compared to working from your own local hard drive.
Writing results to a network drive can result in:
- Simulation studies taking significantly longer to complete
- Simulation studies freezing or hanging mid-solve
- Result plots freezing or lagging when being displayed
In addition, this setup relies on constant, uninterrupted communication between your computer and the server. Even a brief or minor connection disruption can force data transfers to restart, increasing solve times and potentially causing the study to fail.
Cloud Storage
Storing simulation results in cloud-synchronised folders creates similar risks. If a cloud service attempts to synchronise or back up one of the temporary results files while SOLIDWORKS is writing to it, the software may lose access to the file.
This can prevent the solver from starting, cause the study to fail mid-solve, or crash SOLIDWORKS entirely. These issues are especially common for larger, more complex simulations.
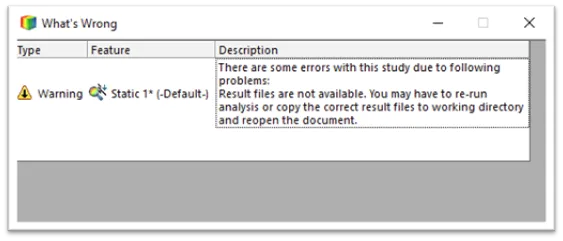
A common error when using cloud storage with SOLIDWORKS Simulation
If files must be stored on cloud storage, you can get around this issue by turning off/pausing syncing while you are working on your simulation studies. Doing this prevents your cloud storage from accessing your simulation results files, so it does not interrupt SOLIDWORKS whilst it meshes and solves your studies.
Saving Simulation Results Locally
The most reliable location for storing simulation results is a local SSD drive. This ensures SOLIDWORKS is only dependent on your local hardware, eliminating synchronisation issues and greatly improving read/write performance.
Using a local drive:
- Prevents simulation freezes and crashes caused by cloud or network interference
- Improves simulation performance
- Eliminates the common errors described above
To enforce this behaviour, SOLIDWORKS provides two ways to control where simulation results are stored. You can define a default save location that will apply to all future simulation studies, and you can also manually update the save location for studies that already exist. Both methods are done slightly differently, and the following sections walk through the steps required for both scenarios.
How to Change SOLIDWORKS Simulation Result Save Location
With two different methods to enforce local saves of simulation results, it is important to know how to update existing and future studies.
Changing the Default Save Location for Future Studies
This method automatically creates a dedicated results folder alongside the CAD file, keeping results organised and separate from design files.
To define where results for all future simulation studies are saved:
- In SOLIDWORKS, click Simulation > Options.
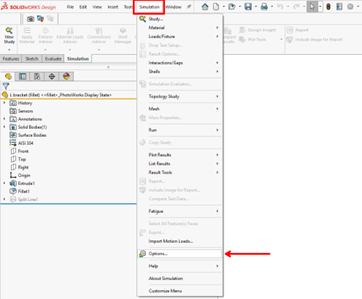
Opening the SOLIDWORKS Simulation settings
- Navigate to Default Options > Solver and Results.
- Select the SOLIDWORKS document folder in the Save Results section.
- Enable Under sub folder.
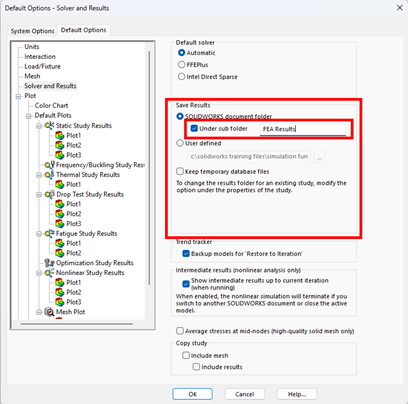
Setting up the results folder
- Enter your desired folder name.
After choosing a location in your file explorer, all future result files from all studies are saved to this single location. This may be preferred by some users as it keeps the result files separate from the CAD files, keeping the working directory tidy, and does not impact the difficulty in solving and plotting results.
Changing the Save Location for Existing Studies
This method is useful for legacy studies that may have previously stored the results in the default location.
To define where results from existing simulation studies are saved:
- Open a SOLIDWORKS Simulation study.
- Right-click on the study name and select Properties.
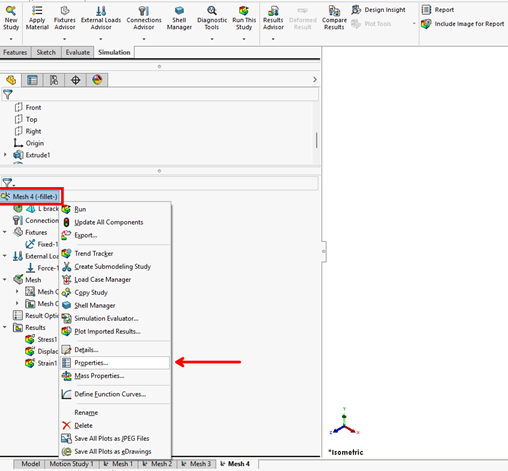
Accessing simulation study options
- Open the Options tab.
- Under the Save Results section, unselect Save results to SOLIDWORKS document folder.
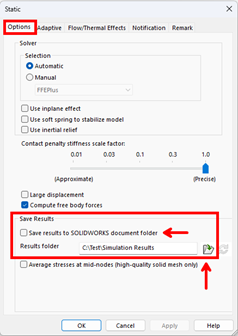
Setting a new results folder for SOLIDWORKS Simulation
- Select the new folder location.
After changing this setting, SOLIDWORKS will give you the option to copy any existing results for that study to this updated location, and any future reruns will be saved here as well.
Other SOLIDWORKS Simulation Settings Best Practices
There are additional settings related to saving the simulation results that you might have noticed.
Keep Temporary Database Files
With this option turned on, these temporary files do not get packaged into the CWR file and instead stay in your file explorer. This can quickly clutter the working directory, so it is best practice to leave this option turned off.
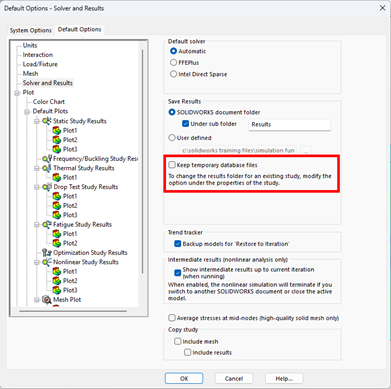
Disabling temporary database files
To find this option, go to Simulation > Options > Default Options > Solver and Results and then look in the Save Results section.
Load All Simulation Studies when Opening a Model
This setting loads all simulation results data for your CAD file automatically whenever it is opened. Keep in mind that this will increase the opening time of the file.
The best practise here is to leave this option turned off to speed up opening times and then to load your studies on demand. With this option turned off, your simulation studies are only loaded when you click to activate them.
Save File After Meshing and After the Analysis Completes
This setting saves all result information after the meshing process is completed, and then again after the simulation has been completed. It can be found in Simulation > Options > System Options > General.
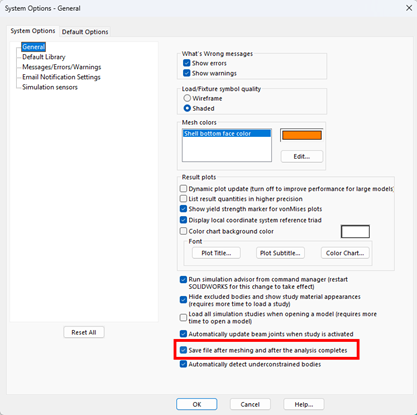
Turning on the option to protect your simulation results
The best practice is to leave this option turned on, as it will help protect against data being lost if a crash were to take place. This is especially useful for a larger number of simulations running concurrently, as it ensures that information is constantly being saved after each run.
Considerations for Simulation Results in SOLIDWORKS PDM
While a solver is running, SOLIDWORKS generates multiple temporary results files that are visible in File Explorer. Once the simulation is complete and the model is saved and closed, these temporary files are removed from File Explorer and packaged into a single CWR results file.
How This Works in SOLIDWORKS PDM
When a CAD model and its results files are saved within a SOLIDWORKS PDM vault, all simulation-related files are initially checked out by the active user. This includes the temporary results files created during the solve process.
Once the CAD file is saved, closed, and checked back into the vault, the CWR file (containing the packaged simulation results) is checked in automatically alongside the model.
Common Issues with Vaulted Results
While this is the expected behaviour, in practice, crashes can and do happen. If SOLIDWORKS closes mid-simulation unexpectedly, the temporary result files may remain in the working directory and never get packaged into the CWR file.
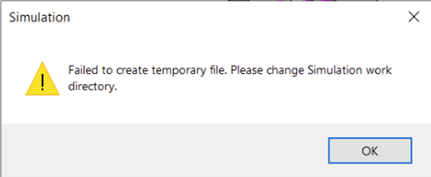
Error caused by results files not being checked out in SOLIDWORKS PDM
When the CAD file is then checked back into the vault, these temporary files remain checked out on the original user’s machine, as the software does not recognise them as files that should be checked in automatically with the CAD file. As a result, other users will be unable to run simulations on the file, as the results data is stuck on a different machine.
Avoiding Simulation Errors in SOLIDWORKS PDM
To avoid issues with using SOLIDWORKS PDM to store result files, there are three common approaches.
- Take CAD Files and Result Files Out of the Vault to Work On
Create a Pack and Go of the model before running simulations, and ensure that a local file location outside of your vault is set up as the results location. This keeps all simulation results local and isolated from the production model. Once the analysis is complete, the model and results can be checked back into SOLIDWORKS PDM as a snapshot in the design process. - Work on CAD Files Saved Inside the Vault with Result Files Saved Outside the Vault
Configure simulation studies to store results in a local folder outside the SOLIDWORKS PDM vault while the CAD file remains saved to the vault. This avoids any confusion with result files being partially checked in or out and ensures full accessibility. - Store Both CAD Files and Simulation Results Files inside the Vault
Store all CAD and results files in the vault. Users must take care to ensure that if they are working on conducting FEA simulations, the CWR and other temporary files are checked out so that they can be overwritten when a simulation is run.
Ensuring Consistency with SOLIDWORKS Simulation
SOLIDWORKS Simulation generates external files saved to your folder structure, which store the calculation data needed to solve studies and plot the results. Each simulation study in a single CAD file generates its own set of results files, making good file management essential. Without it, the clutter of results files can quickly get out of hand.
It is best practice for these files to be stored locally to ensure optimal performance, minimise errors, and reduce the risk of crashes or data corruption. Network drives, cloud storage locations, and synchronised folders are not suitable for simulation results and are well known to cause both obvious and more subtle issues.
Even if error messages are not immediately visible, storing results files in the above locations can lead to slow performance, unexpected crashing, or freezes. Setting up your results storage correctly from the start will save time, reduce frustration, and improve confidence in your simulation workflow.
Categorised as: SOLIDWORKS Simulation
Get Expert SOLIDWORKS Training
Get hands-on SOLIDWORKS training in-person or online, led by certified experts with real industry experience. With venues across the UK & Ireland, it’s easy to start learning today.
Related Posts
So how accurate is SOLIDWORKS Simulation?
How accurate is SOLIDWORKS Simulation? Elite Applications Engineer Chris Boyles investigates.

A systematic approach to complex analysis models – “Crawl, Walk, Run”
Most engineers start out performing simple linear statics analysis model. Provided you’ve done the basic…

What Happened to the SOLIDWORKS Forums?
The SOLIDWORKS Forum looks a little different these days. Find out what’s changed and what that means for you and your business.

SOLIDWORKS Tips: How to Create a Revolve in SOLIDWORKS
Revolves are axis-symmetrical or turned forms, like straight pipes, spheres and basic water bottles. Here’s how you make a revolve in SOLIDWORKS.

How to Create a Sphere in SOLIDWORKS
Creating a sphere in SOLIDWORKS can be achieved using a single sketch and a single feature in less than 10 seconds.

Simulation Tips: How to Customise MSC Apex
Learn how to create custom toolbars in MSC Apex

MSC Nastran: Smoothing the Way with Analytical Contact
Improve the performance of your simulations in MSC Nastran with this simple trick!
How Much Weight Does it Take to Break a Barbell? Testing to Destruction with SOLIDWORKS Simulation
Discover how to predict potential failure points and optimise product designs to enhance durability and provide peace of mind to the consumer with this SOLIDWORKS Simulation tutorial.
Virtual Twins Are Now Mainstream – Here’s What It Means For Product Engineering
Staying on top of today’s competitive landscape means not just implementing technology but doing it…